And don't worry, if you need to stock up on quality guitar strings, Guitarbitz has got you covered with our wide range of strings available for purchase.
The Strings
The outer wire is either made from 80/20 Bronze or Phosphor Bronze. These are called "wound" strings. For help choosing a new set, see our String Guide. The trebles are made from a single strand of nickel-plated steel and are referred to as "plain".
Getting an even tone
If you need any help choosing a set for your acoustic guitar or need any help when trying to fit them contact us or drop by the store and we'll be happy to help.
Tools you'll need
- A new set of acoustic guitar strings!
- String Cutters
- Spray Cleaner
- String Winder
- Headstock Stand
- Lemon Oil
- two cloths - one for cleaning the body and one for the lemon oil
- A tuner to get your guitar back in tune afterwards

STEP 1
Slacken the strings and remove the strings from the machine head/ tuning peg. You can use the winder to make this quicker.

STEP 2

STEP 3
One option is to push the bridge pins up from underneath. To do this go in through the sound hole and feel for the bottom of the pins, you may wish to use a cloth to protect your hand as they can be slightly sharp.
They are quite often stuck because the ball end is jammed in the hole by the pin, so do try and pull this out from the bottom too by pulling the ball end from the bottom and pushing from the string from the top.

STEP 4
Most string winders have a slot that can be used to remove bridge pins. Be careful as this can mark the wood, or alternatively you can try a pair of pliers with a cloth wrapped around the ends, so it doesn't damage the pins but both of these should be a last resort.

STEP 5
Pull the pin upwards and hopefully it will come out fairly easily if you have followed the previous steps.
STEP 6
This is a great time to give your guitar a deep clean and get off the dust that would normally be hard to reach, including the fretboard, saddle, bridge & scratchboard (if your guitar has one).

STEP 7
Put a few drops of lemon oil on a cloth, if your fretboard is a dark wood such as rosewood or ebony.

STEP 8
Slowly work the lemon oil into the wood up and down the fingerboard, don't wipe it all away let a small amount soak in for 30 seconds or so.

STEP 9
You can also hydrate the bridge if it looks very dry. Make sure you remove the saddle first or avoid it as the lemon oil can cause strings to slip on the saddle.

STEP 10
Grab your new packet of strings and take a close look at what order the strings go in and this is crucial to restringing guitar correctly.

STEP 11
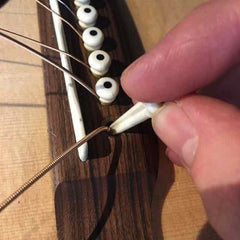
Add a 45° bend at the end of the string. This will help make sure the ball end is in the correct position, which will improve tuning stability.

STEP 12
Push the ball end down with the bridge pin. Make sure the tail of the string sits in the groove of the pin and that this groove is pointing straight down the neck.
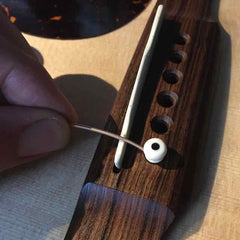
STEP 13
Repeat these last two steps for the other five pins. Pull on the tail of each string to make sure the ball end is in contact with the bottom of the pin.

STEP 14
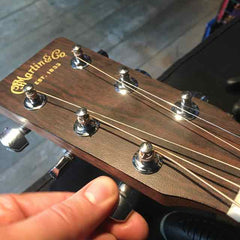
Make sure the holes on each machine head are pointing straight down the neck.

STEP 15
Draw the string over the saddle, over the top of the nut and through the hole in the machine head.

STEP 16
Pull the string tight and measure to the next machine head along. This will give you a good amount of winds around the post and again help with tuning stability.

STEP 17
Pull the excess you have measured back through the post and begin to wind anti clockwise, make sure to keep some tension so the measurement you made stays the same. The string running down the neck should always be on the inside of the post.

STEP 18
Make sure the new wraps are on the bottom pushing the previous wrap upwards.

STEP 19
Start tightening the string until there is a small amount of tension. A couple of winds around the post should be enough.

STEP 20
Take your wire cutters and trim off the excess string. The closer you can get the neater it will look.

STEP 21
Do the same for the remaining 5 strings, gradually working from the thickest to the thinnest.
STEP 22
Once all the strings are on you can bring them all up to the correct pitch. Bring all the strings up to pitch gradually moving back and forth between each string so the tension is even across the neck.
We're using a clip on guitar tuner here.

STEP 23
Now the guitars up to pitch you need to stretch in the strings. This is a vital step as it will stop your guitar dropping its tuning, it will eliminate a lot of time wasted retuning to break in the strings. Tune it back up after doing this and you should be ready to play some tunes!

Buy Guitar Strings
Ready to restring your acoustic guitar? Shop our selection of top-quality acoustic guitar strings and get your guitar sounding its best!
Shop acoustic guitar strings now!
Final notes
After a few times doing this you'll become familiar with the process and much quicker at it. It can be slightly daunting at first but will make your guitar far nicer to play. Good luck!
You can grab any of the acoustic guitar parts or accessories mentioned in this guide on our website, and check out our other helpful how-to-guides to get the most and best from your instrument.